

In article three of the Family of Origin for the Therapist series, you learned 3 simple steps for how to begin family of origin (FOO) exploration: 1) read Bowen’s chapter, 2) observe your FOO experience, and 3) reflect on what you learned. Hopefully, your curiosity has led to significant understanding.
Understanding is the foundation of Bowen Family Systems Theory (BFST). Bowen (1985) believed that if clients could understand themselves as members of their FOOs and as created by their histories, they could begin and continue significant change.
In today’s post, I offer the next step in developing understanding: Creating your genogram. I explain how to create a basic genogram that you can expand as you continue your exploration.
What is a genogram?
A genogram is a visual representation of a family system, incorporating at least three generations of the system. Its purpose is to help the member of the system (in this case, you) see their context in visual form, so that pivotal moments and notable patterns can be acknowledged and recorded (Kerr & Bowen, 1988). The genogram was developed by Murray Bowen, but has since been adopted by many family therapy approaches, as well as disciplines outside of family therapy.
Creating Your Genogram
During this step, you will be creating the basic outline of your three to four generation genogram and noting all family members, relationships, and deaths. During future steps, you will expand on the details of your genogram and include dates, relationship dynamics, and patterns. But, right now, you will focus on four foundational steps.
Supplies
Before you begin, gather the following supplies:
If you're meticulous:
Poster board or a large piece of paper
Pencil
Eraser
Pencil compass
Ruler
If you're comfortable hand-drawing your genogram, then you'll only need the first three items.
You can create also create a genogram electronically using GenoPro or Microsoft Word. I created the genogram that I use for illustration in this post using Microsoft Word, by inserting shapes.
Okay. Let's get started with the steps.
1 | Draw a basic genogram, beginning with your current family system
Your current family system is you, in your current relationship or living situation. It includes: your parents, if you live at home; your partner, if you live with him/her; your children, if you are a parent. When you draw your symbol, include a double line (circle or square) to signify that you are the one taking on the family of origin exploration. If you create a genogram with a client, then the client is the "explorer."
In the example below (Figure 1), Amy is the therapist creating the genogram; she is the "explorer." She is married to Bob, and they have a daughter, "M." Marriage is noted by the solid line that connects Amy to Bob, and runs above "M." If Amy and Bob were not married, this line would be dashed (as shown in Figure 2).
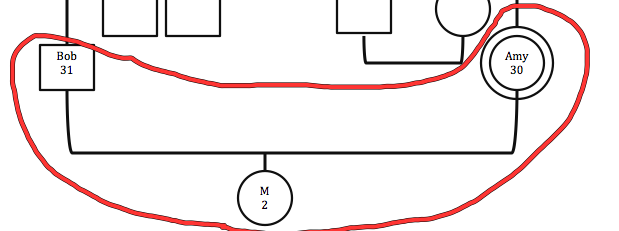
Figure 1: Amy's current family system
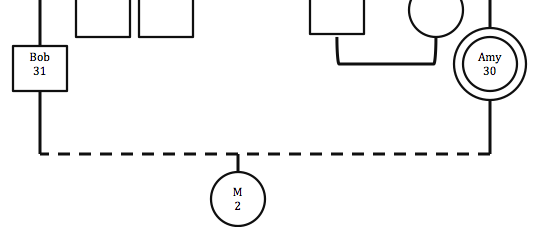
Figure 2: How to mark an unmarried couple, living together
Note: Males are represented by squares, and females are represented by circles. Males are always on the left, and females are always on the right. As you see more of Amy's genogram, you'll see why this is important.
Begin drawing your genogram low and centered on the paper. This will make it easier to add generations as you continue. Your basic genogram will include at least three generations "above" your generation, but ideally, you'd include as many generations as possible. For my first genogram, I included five generations; I was a member of the first generation at the time, because I did not yet have a child. My genogram included my great-great grandparents. I am not suggesting you take this on right now, but I am encouraging you to not set a limit for yourself, because you never know what you might learn during your exploration.
2 | Add the next generation, and place yourself and the members of your generation in the corresponding relationships and sibling positions
In the figure below, Amy's genogram has been extended to include her family of origin, including her older brother, her mother, and her father. She has been linked to her FOO by a solid line placing her in her sibling position as the second child of two children. Her older brother is married, and he is connected to his wife, as well as his family of origin.
As you draw this generation, make sure to include all siblings, and their relationships and children. Also complete the family of origin system for your partner.
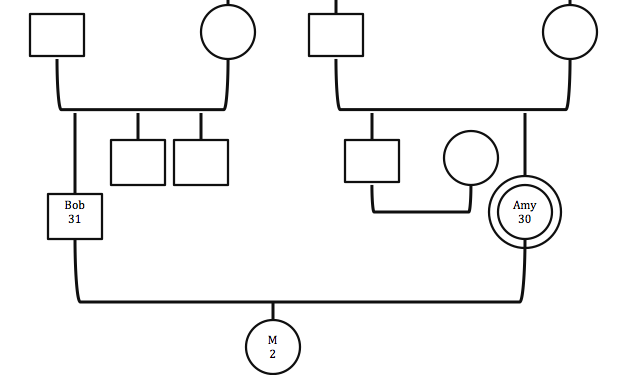
Figure 3: Amy and Bob's family, and their families of origin
3 | Add the third generation, and repeat the process in step 2
The figure below is a four generation genogram, beginning with "M" as the first generation, and ending with Amy and Bob's grandparents as the fourth generation. As you can see in Figure 4, genograms can be complex and extensive. And, this is a very basic genogram. On a completed, accurate genogram, you would see everyone's relationships (marriages, separations, divorces, etc.), children, miscarriages and adoptions, as well as relationship dynamics and patterns. But, we will get to that in future posts. :-)
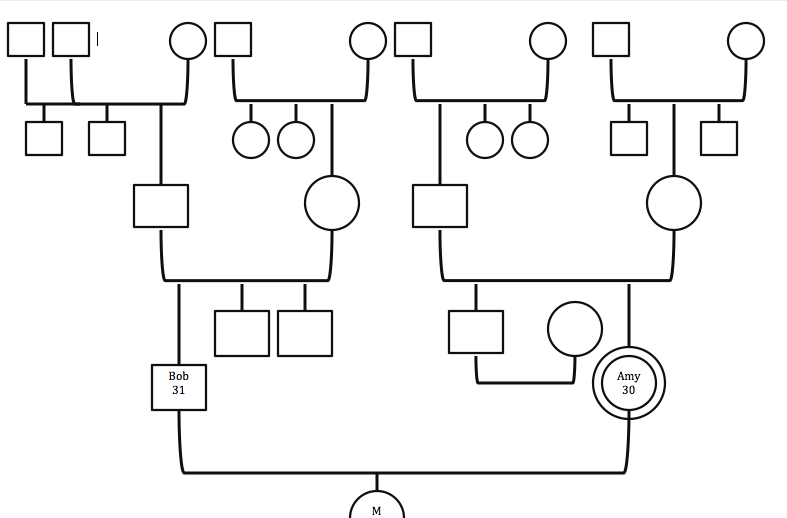
Figure 4: Amy's four generation genogram
Note: The small line at the top left is the cursor in Word that showed up on the screen shot. It means nothing. :-)
4 | Mark significant information
Once you have three to four generations on your genogram, begin filling in some basic information.
Include:
The name and current age, or date of birth, of each person inside their symbol
Mark the deceased with an X through their symbol (shown below)
Indicate divorce with two slanted lines perpendicular to the marital line (shown below)
Note marital separation as one slanted line perpendicular to the marital line (Figure 5 below)
If possible, record all deaths, divorces, and separations with the date or year they occurred. If, in order to do this, you have to do some research, then wait to record these details. During this portion of your exploration, record only information you know.
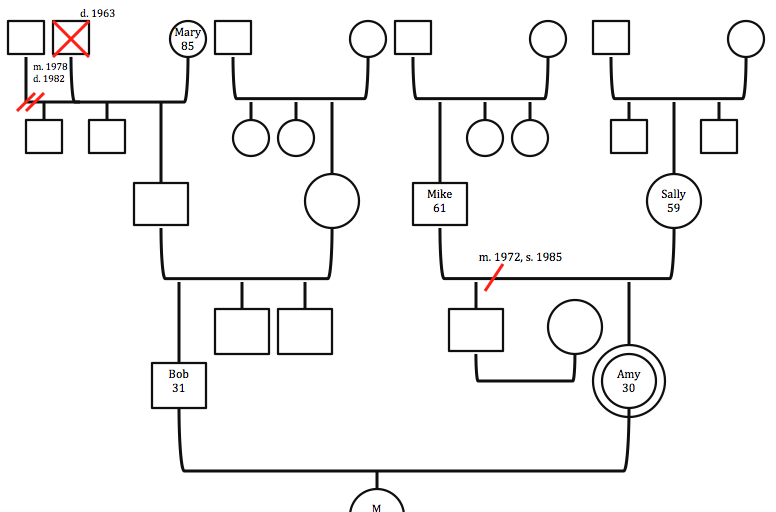
Figure 5: Amy and Bob's parents and grandparents

Figure 6: Bob's paternal grandparents
Note: Death and other details do not need to be marked in red. I have done this for illustration purposes only.
In Figure 6 (above), you see that Bob's grandfather died, and Mary, Bob's grandmother, re-married and later divorced. This is an example of how more than one marriage, or significant relationship, can be noted on a genogram. If Mary had married a third time, there would be an additional square in the family system on the left of her second husband.
Summary
After creating your basic genogram, you should have a genogram that looks similar to Figure 5, but with more details, such as names and ages, deaths, marriages, divorces, and significant relationships. It's important to include all persons that belong to your family system, even if it means you need more paper!
Here are some additional symbols you may need for your genogram:
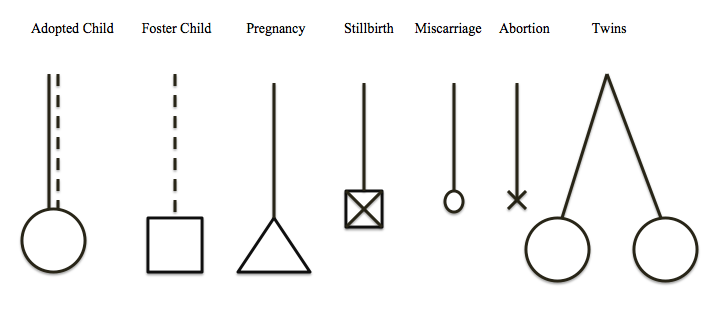
Figure 7: Symbols for recording children of a family system
Note: The lines marking stillbirths, miscarriages, and abortions are shorter than living children
Resources
In order to continue your family of origin exploration, you will need a manual for learning about genograms and genogram symbols. It will also help you to have sample genograms as you move forward with tracking patterns over generations. The following books have been genogram "Bibles" for me throughout the years:
If you are a beginner with genograms, I recommend the Marlin book, because it includes step-by-step detailed instructions that simplify the genogram creation process. It is also written to the "explorer," not the therapist. It is a book that can be handed to therapy clients to support their own family of origin exploration. You can also peruse each book using the "look inside" feature on Amazon, and decide which one is best for you.
Video Summary
Let's Chat
Have questions about creating your genogram? Pose them in the comments below.
Want support as you go through this process? Join the Get Refreshed Facebook group.
I've added the genogram example and the symbols used in this post to the free Family Therapy Basics resource library. If you're not already registered, access it here: